
In our most recent webinar, Terrie Critchon, a CellTrak Trainer from our Learning and Development Team, offered useful tips and tricks for Operations Team Portal users. Check out the highlights from the webinar, and scroll to the bottom to view the full webinar!
Scheduled Vs. Actual Report
In the Operations Team Portal, Use the Scheduled vs. Actual report to identify overserving and underserving. You'll find it on the Admin tab. In the bottom left corner with the other reports. Pull down the scheduled vs. actual report, and look In the “Difference Column”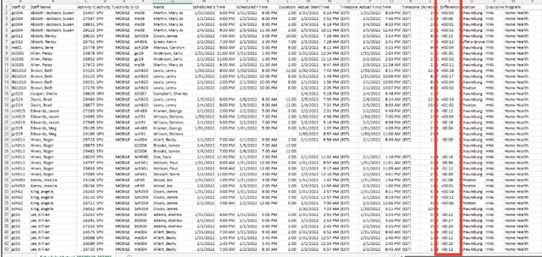 highlighted in red here. You can easily view the time difference between the time scheduled and the actual time spent on the visit.
“If the staff is supposed to arrive at 10 and depart at 12, but they arrive at, 9:50 and they depart at 11:30, it will show you the difference in the duration.” Let's look at an example to see how this could help you.
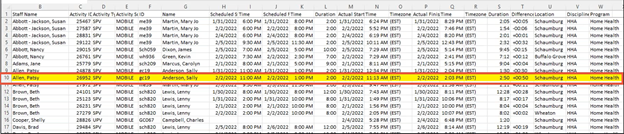
Example 1, Overserving: Staff Patsy spent an extra 15 minutes with the patient, Sally Andersson
Should we have alert triggers when the caregiver notes a change in condition? Who should that alert go to? Should an external notification go out to the clinical manager for an intervention?
What may have happened:
- An emergency may have occurred
- Staff forgot to clock out
- Staff didn’t have enough time to complete visit activities
- This visit required more tasks than usual
What you can do:
- Schedule more time for the caregiver
- See if the caregiver left progress notes or changes in condition that may affect the amount of time needed for care
- Reach out to staff to see if they can provide insight
- Ask staff to fill out an acknowledgment comment for these situations.
- Compare visits. Does this happen often? Or was this just a one-time error?
That height and distance report can give you some insight when you're not there.
Managing Alerts Vs. Visit Exceptions
Alert Setup
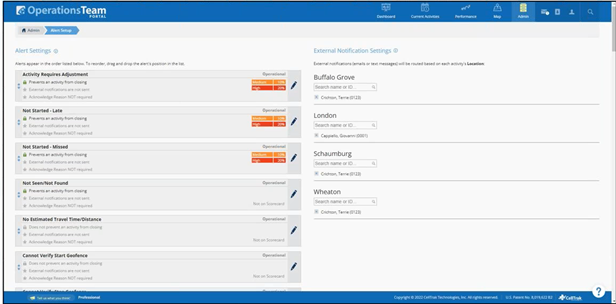
It’s a good idea to occasionally review your Alert Setup, as your needs may change. You may want to change the following settings:
-
Should the alert be locked or unlocked - If you have change in condition questions at the end of visits, should those alerts be locked or unlocked?
-
Should an external notification be sent when the alert triggers? - Should we send a notification notices a change in condition (patient isn't walking as well, patient is hospitalized) Should an external notification go out to the clinical manager?
-
Should the Portal Users enter an acknowledgment reason when clearing the alert? - Staff can include acknowledgment reasons when completing a visit. But are they including good details? If not, you may consider turning this feature off so you don’t have extraneous alerts.
-
Should the Alert be displayed on the Scorecard? What Should be the Medium and High Threshold? - On your dashboard, which alerts should go on the scorecard, regardless if there's a notification?
Updating these alert settings can help you avoid too many alerts and streamline your dashboard based on what is most important. Use the Audit log to help you decide if you should get rid of certain alerts:
Audit Log

In the Admin Page on the bottom left corner, the Audit log is the very last report. This can be used to see who has cleared alerts, who is looking at activities, what kind of comments the office team is making when acknowledging alerts.
Set the Audit Log report to -
Logged by = Member
Record Type = Activity
Cleared Alerts
Are all comments worthwhile? Comments can help you understand why alerts happened, why a patient may have been over or underserved, or why the caregiver may have left the geofence early. But simply receiving a comment that says OK, isn’t so helpful. You may review comments and decide to turn off acknowledgement reasons since the comments are unhelpful.
Visit Exceptions and Closed Activities
It happens. patients refuse visits for a handful of reasons. Unfortunately, this typically requires a little extra work in the office as the office has to find a different time slot to fulfill that patient need later in the week.
Use Closed Activities to find visit exceptions. Use the filter in the top left corner to find finished with visit exceptions, as seen in the red box in the photo. You can filter closed activities by setting a date range, filtering by caregiver, or filtering by patient.
Terrie notes, “Sure, you could look at it from the closed activities page, but you can always use the download there and pull out a CSV 'cause once you get it as a CSV, you can sort and filter and fuss to your heart's content.” By downloading to a CSV, you can sort by staff, patient, date, discipline, and more. Let's look at an example to see how this can help.
EX. 3 Staff Tammy Smith Has 5 Visit Exceptions
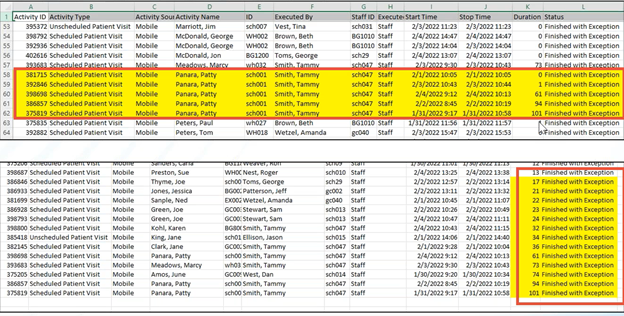 Tammy has noted 5 visit exceptions, meaning she did not provide care, but we can see in the chart that three of them have visit durations. Did Tammy hit visit exception when it should have been a finished visit? This might be a sign to reach out to Tammy and make sure she understands what a visit exception is. Or, use Secure Messaging to mass messsage all caregivers with a reminder about visit exceptions. Additionally, in current acitivites, you'll find a visual indicator in the form of an exclamation point when there's been a visit exception.
You can also filter for visit exceptions in current activities to look at all visit exceptions at once.
How to Manage and Reduce Alerts
By identifying those top offenders', how do we find the people that are triggering the most alerts, causing the Office team, to spend the most time on fixing visits instead of handling their other responsibilities.
In the top right corner, click the admin tab and find the alerts page. Alerts page and that you can find on the Admin tab, in the, top corner of the Admin tab. In the alerts page, set your date range to view alerts from a certain time period. CellTrak 7.0 and later features the Alerts report, which runs in the background just like closed activities. When the icon turns yellow, download your report. Terrie recommends using pivot tables to help sort through your alerts data.
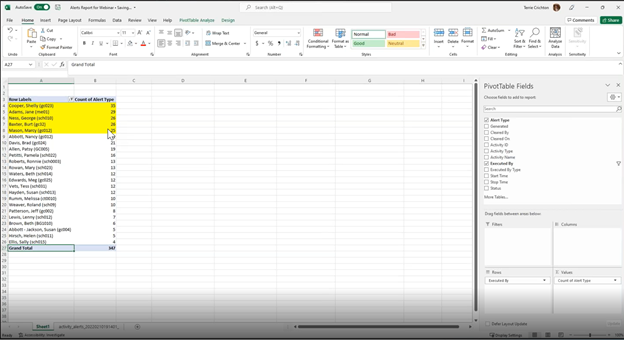 “If you’re not a pivot table expert, use the link we’ve included to help you understand pivot tables (https://youtu.be/m0wl61ahfLc). What you do with a pivot table is, once you get your data, you go to the Insert and you insert a pivot table, and you're going to come up with all these fields. But what you do is you say, OK, show me the alert type And you pull a deal. And you say, OK, show me who did it. And you pull that down to your rows. So now here's my list of staff in the rows, and here's the number of alerts, and now I've identified my top five offenders."
What you can do to help top offenders:
- Allow more time between visits for travel
- Check-in with caregivers who chronically trigger alerts
- Identify blockers to being on time – traffic, transportation, construction in the neighborhood, bad weather conditions for travel.
For more tips and tricks, check out our full webinar recording below!
A Note about Data: All data shown in screenshots is fictitious, to be used for training purposes.